Latest News and Event
Black & white documents, are you using black toner or colour toner?
Posted on
Many employees now have the choice and freedom to print their work from any of the printers and copiers at their disposal, without limitation. This offers great convenience for all your staff, but did you know they could be draining your colour toner without even realising it, and consequently, massively increasing your printing costs?
Let’s go back to basics. There are two main types of multifunction printer – colour and black and white. Black & white printers do what they say on the tin, print in black and white using solely black toner, this is sometimes referred to as monochrome, or mono printing.
In contrast, colour printers give you the option to print in black & white and colour. To produce a colour print, your office printer will be using a mixture of toners commonly known as CYMK (cyan, magenta, yellow and black) or process colour. What some people fail to realise is that if your machine is capable of colour printing, then there are two different ways your printer can produce black. Get it wrong, and your print costs could go through the roof!
Black can be made up from a combination of all 4 inks, CMYK (sometimes called a rich black or 4-colour black), or can solely be made up by the 4th toner K (black). The outcome may look the same to the average eye, but the cost to the bill payer would be dramatically different, and you will find yourself replacing all your toner cartridges regularly.
When sending your document to print there are a few essential steps you should take to make sure your printer is using K toner for printing your black text.
Printing a document with just black text
Most day-to-day office documents and emails require users to print in just black & white, so it is important that these documents are set up correctly before printing, to avoid using anything other than the black toner.
Step 1 – When you are ready to print your job, press ‘file’ then ‘print’ to open the printer driver. On the printer driver, select the second drop down under the “Presets” option, then select “Colour”.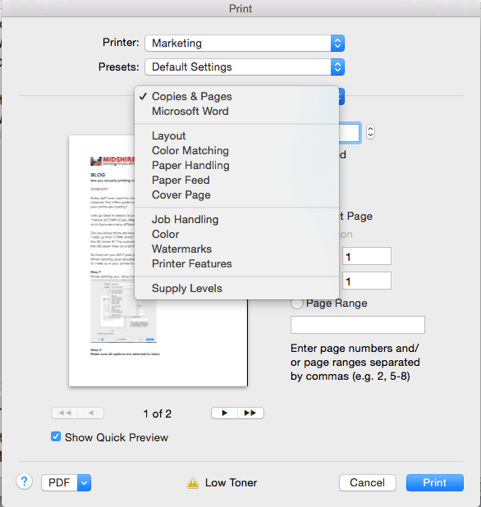
Step 2 – In the colour options pane, select the black & white option from drop down “Colour Mode”.
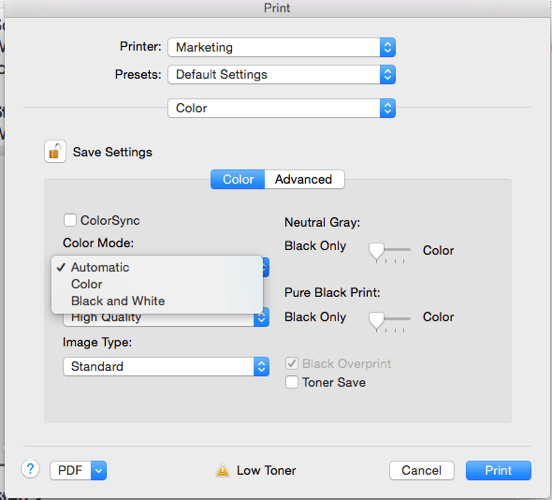
Now, when your document is printed, it will only use the black toner. This method can be very useful when printing emails or drafts of documents, as you don’t always need logos and images printing in full-colour. By selecting the black & white option, these images will come out greyscale.
Printing a document with some colour and some black text
Sometimes, there is a need to print your company logo on a document, and if this is something you do regularly, the best option here would be to get some pre-printed letterheads, which you can overprint on your copier. The lithographic, or litho-print process, is designed for this very purpose and usually works out a lot cheaper, than producing the whole thing digitally on your office copier. As even though only a small amount of colour toner would be used to just print a logo, the click charge would be recognised as a colour click, and so would be far more expensive than a mono click. When using pre-printed letterheads you would simply use the steps outlined above, to ensure that the text you are printing is just using black toner.
Using a pre-printed paper however, might not always be an option. If you need to print a document with some colour imagery and some black and white text, you need to make sure you are telling the printer to distinguish between the different elements. Making sure you are only printing the sections of the document in colour that are essential will reduce the amount of C, Y and M toner used.
This will not reduce the overall cost of the print outs, as a colour click will be charged at a colour rate. But it is a more environmentally friendly option, that will reduce any unnecessary use of toner. If you are designing documents that will be outsourced to a commercial printer, then understanding and following this process is absolutely critical in getting professional results.
To do this follow these simple steps:
Step 1 – Highlight all text you would like to be black & white. Click the little arrow to the right of the Text Colour icon which looks like an A with a red rectangle below it. Click on the “More Colours…” option from the drop-down menu.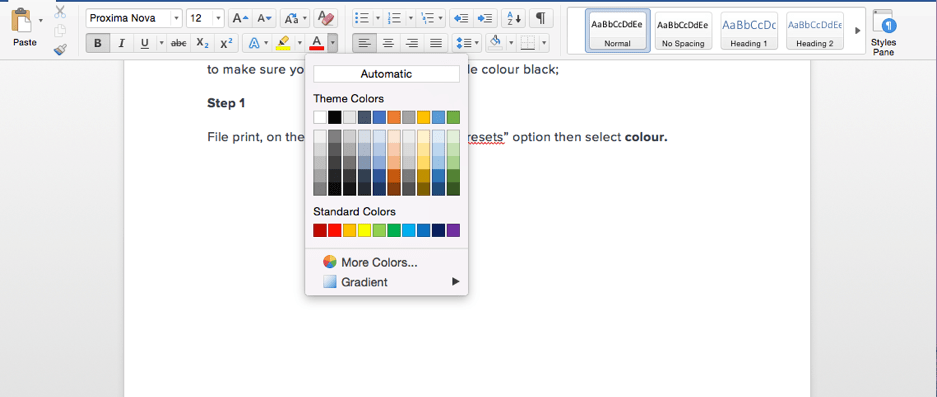
Step 2 – Click on the second tab along with the colour sliders. On the dropdown just below the tabs, use the dropdown to select ‘CMYK Sliders’. Make sure Cyan, Magenta and yellow are all set to 0% and black is set to 100%. This will ensure you are only using single colour black for the text.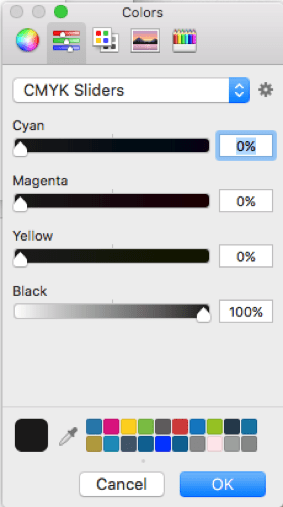
I want all my staff to have to print in black & white – can I create a company-wide rule?
 We have now discussed how to print in single-colour black, but how can you implement this across your organisation? PaperCut is a software that makes the management of printing easy! Guaranteed to reduce your businesses printing by a minimum of 15%, PaperCut enables you to restrict permissions to print black & white, by employee or department, which will mean no colour printing is possible unless the user has the correct authority. Ultimately resulting in lower print costs!
To find out more about PaperCut software or how Midshire can reduce you printing costs call us today on 03332 413 433.
